- Layout the buzzer, battery holder, pushbutton switch and mercury switch on perforated board according to the circuit diagram.
- Drill a hole in the board to slip the push button switch through. You can accomplish this by using drill bits without the drill. turning a small diameter bit with your fingers, drill a small hole. Use a larger bit to enlarge the hole. The perforated board is soft enough that you can make the holes easily. You may want to ask your adult helper for help with this step.
- Cut three pieces of wire of the correct lengths to:
- attach from one lead of the mercury switch to one terminal of the on-off switch. You will have to push the lead through the board since the terminals of the push button switch are below the board.
- attach from the other terminal of the on-off switch to the negative terminal of the battery holder. Bring the lead up through the board.
- attach from the red lead of the buzzer to the positive lead of the battery holder.
- Attach the black lead of the buzzer to the remaining lead of the mercury switch. This completes the series circuit. Check to make sure you have wired it correctly before proceeding to the soldering steps.
- Plug in the soldering iron and let it heat up.
- Solder the following joints:
- wire to mercury switch lead
- wire to each terminal of the on-off switch
- wires to connection to battery holder
- red lead of buzzer to positive terminal of battery holder
- buzzer black lead to mercury switch
- Unplug the soldering iron.
- Test the circuit:
- turn the push button switch on and put the mercury switch in the one position and then the off position. When the push button switch is on, the mercury switch should turn the buzzer on the off when tilted back and forth. This test is to see if the circuit will work before it is mounted to the inside of a box lid.
- next, turn the push button switch to the off position and switch the mercury switch on and off. The alarm should not sound.
- Position the circuit to its final location on the perforated board. Hot glue the following:
- the lead of the mercury switch to the perforated board. Glue the leads so that the angle of the mercury switch glass bulb can be adjusted to turn on when the lid of the box is moved.
- the buzzer and battery holder to the perforated board.
- the four wooden spacers in each corner of the board. The spacers make room for the push button switch to stick out below the perforated board.
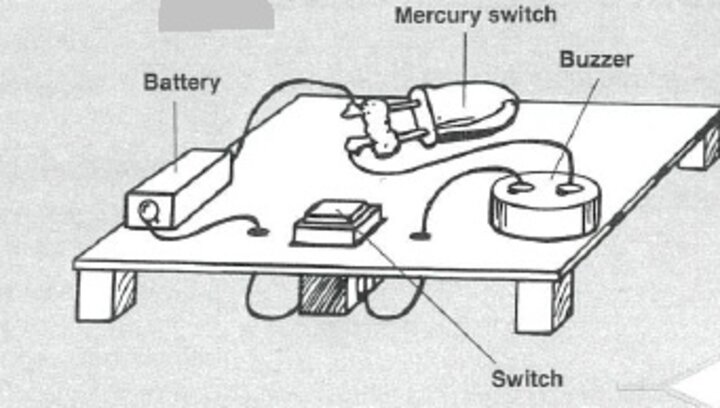
Alarm Diagram
Be careful with hot melt glue. It is hot and can burn you. Ask an adult for help.
- Mount the perforated board circuit board on to the inside of the box you want to protect with the alarm circuit by hot gluing for four wooden spacers to the lid. A pencil box works well. Any box with a hinged lid is fine.
- Adjust the mercury switch so that the alarm will sound when the lid is opened. This adjustment is made by bending the leads to the mercury switch where you glued them to the perforated board.